Glencoe Tartan Poncho Crochet Pattern

Stripped nearly bare by sheep and deer, the rock strewn hills and empty meadows greet you with a sense of adventure as you travel throughout rugged landscapes of the Highlands, thick with mist and towering mountains.
Whilst freely roaming through rolling hills of lush green and heather, the Glencoe Tartan Poncho provides ample room for those on-the-go needing a soft garment to retreat into. Simple comfort elevated by carefully chosen details, this pullover will have you feeling bundled in the winter months, all thanks to the timeless turtleneck and flowy, flattering drape. Side vents and exaggerated sizing give this garment easy style, while the rich, mirrored tartan design harkens back to the past, brought beautifully up-to-date in a modern piece with lasting appeal.


With a flask of tea slipped into your bag, the misty moors offer a compelling place to head as you wander through the valleys enveloped in your newfound companion, the Glencoe Tartan Poncho… The kind of perfect pullover that is day-in-and-day-out cozy and comfortable!
As with my Meara Fisherman Sweater, there is something so satisfying about the squish factor of Lion Brand’s Wool-Ease, so I knew I wanted to incorporate a similar cosiness into this pullover as well. I decided on a combination of Lion Brand Wool-Ease and Touch of Alpaca (a new favorite of mine!), as their versatility, durability, and color range worked perfectly together.

This is a wonderfully uncomplicated pattern that will challenge beginners and keep experienced crocheters interested, as creating a tartan design with crochet is a great way to expand your skills and learn a new tool that can really elevate your work.
Crocheted in aran weight yarn, the Glencoe Tartan Poncho uses both single crochets and a woven technique to bring you a modern yet cosy winter essential!.. Perfect for weekend lounging as it is for exploratory outings. Scroll down to find the free pattern, purchase an ad-free printable version here, or head to Lion Brand to snag the yarn kit.

Add To Cart
Purchase the ad-free, printable PDF pattern here.
Purchase the yarn kit from Lion Brand here.
Materials
6mm (J/10) Crochet Hook
8mm (L/11) Crochet Hook
2625yds Aran (10ply) Yarn
— Lion Brand “Wool-Ease” 098/Natural Heather (11 skeins), Color A
— Lion Brand “Touch of Alpaca” 152/Charcoal (2 skeins), Color B
— Lion Brand “Touch of Alpaca” 138/Crimson (1 skein), Color C
Tapestry Needle; Stitch Markers;
Finished Size
Width: 43″ (109cm)
Length: 27” (69cm)
Gauge
10 stitches + 13 rows = 4″/10cm using 8mm in sc
Stitches & Abbreviations
st(s) – stitch(es)
ch – chain stitch
sl st – slip stitch
sc – single crochet
blsc – back loop single crochet
sc2tog – single crochet 2 together
Single Crochet 2 Together (sc2tog)
Insert hook in the next st. YO, draw up a loop (2 loops on hook). Insert hook in the next st. YO, draw up a loop (3 loops on hook). YO, and draw through all 3 loops on hook.
Skill Level
This is an “Easy” level crochet pattern (includes “How-To” photos). You must be familiar with basic crochet stitches and techniques. Directions written so that they are easy to read and follow. All patterns are in English, and written in standard US terms.

+ PATTERN
Note: Garment is worked in 2 panels side to side that are seamed together at the shoulders to create the final poncho. The roll neck is worked in the row, side to side, and seamed to the neckline. It is imperative to check gauge and maintain an even tension throughout to ensure pieces ft together. This is an easy level crochet pattern and the techniques involved are single crochet, decreasing stitches, and basic embroidery skills.
+ FRONT OF PONCHO
Ch72 using A yarn and 8mm hook.
Row 1: 1 sc in 2nd ch from hook, 1 sc in next 14 sts. 1 sc in next 8 sts in “B”. 1 sc in next 8 sts in “A”. 1 sc in next 3 sts in “C”. 1 sc in next 33 sts in “A”. 1 sc in next 4 sts in “B”. Turn your work. (71 sts)
Row 2: Ch1, 1 sc in same st, 1 sc in next 3 sts. 1 sc in next 33 sts in “A”. 1 sc in next 3 sts in “C”. 1 sc in next 8 sts in “A”. 1 sc in next 8 sts in “B”. 1 sc in next 15 sts in “A”. Turn your work. (71 sts)
Row 3: Ch1, 1 sc in same st, 1 sc in next 14 sts. 1 sc in next 8 sts in “B”. 1 sc in next 8 sts in “A”. 1 sc in next 3 sts in “C”. 1 sc in next 33 sts in “A”. 1 sc in next 4 sts in “B”. Turn your work. (71 sts)
Row 4 – 51: Repeat row 2 – 3.
Row 52: In “A”, ch1, 1 sc in same st, 1 sc in next 3 sts in “B”. 1 sc in next 33 sts in “A”. 1 sc in next 3 sts in “C”. 1 sc in next 8 sts in “A”. 1 sc in next 8 sts in “B”. 1 sc in next 15 sts in “A”. Turn your work. (71 sts)
Row 53: Ch1, 1 sc in same st, 1 sc in next 14 sts. 1 sc in next 8 sts in “B”. 1 sc in next 8 sts in “A”. 1 sc in next 3 sts in “C”. 1 sc in next 33 sts in “A”. 1 sc in next st in “B”. 1 sc in next st in “A”, 1 sc2tog (creating neckline). Turn your work. (70 sts)
Row 54: Ch1, 1 sc2tog, in same st, 1 sc in next 34 sts in “A”. 1 sc in next 3 sts in “C”. 1 sc in next 8 sts in “A”. 1 sc in next 8 sts in “B”. 1 sc in next 15 sts in “A”. Turn your work. (69 sts)
Row 55: Ch1, 1 sc in same st, 1 sc in next 14 sts. 1 sc in next 8 sts in “B”. 1 sc in next 8 sts in “A”. 1 sc in next 3 sts in “C”. 1 sc in next 33 sts in “A”, 1 sc2tog. Turn your work. (68 sts)
Row 56: Ch1, 1 sc2tog, in same st, 1 sc in next 32 sts in “A”. 1 sc in next 3 sts in “C”. 1 sc in next 8 sts in “A”. 1 sc in next 8 sts in “B”. 1 sc in next 15 sts in “A”. Turn your work. (67 sts)
Row 57: Ch1, 1 sc in same st, 1 sc in next 14 sts. 1 sc in next 8 sts in “B”. 1 sc in next 8 sts in “A”. 1 sc in next 3 sts in “C”. 1 sc in next 33 sts in “A”. Turn your work. (67 sts)
Row 58: Ch1, 1 sc in same st, 1 sc in next 32 sts in “A”. 1 sc in next 3 sts in “C”. 1 sc in next 8 sts in “A”. 1 sc in next 8 sts in “B”. 1 sc in next 15 sts in “A”. Turn your work. (67 sts)
Row 59 – 80: Repeat row 57 – 58.
Row 81: Repeat row 57.

Row 82: Ch1, 2 sc in same st, 1 sc in next 32 sts in “A”. 1 sc in next 3 sts in “C”. 1 sc in next 8 sts in “A”. 1 sc in next 8 sts in “B”. 1 sc in next 15 sts in “A”. Turn your work. (68 sts)
Row 83: Ch1, 1 sc in same st, 1 sc in next 14 sts. 1 sc in next 8 sts in “B”. 1 sc in next 8 sts in “A”. 1 sc in next 3 sts in “C”. 1 sc in next 33 sts in “A”, 1 sc in next st, 1 sc in turning ch. Turn your work. (69 sts)
Row 84: Ch1, 2 sc in same st, 1 sc in next 34 sts in “A”. 1 sc in next 3 sts in “C”. 1 sc in next 8 sts in “A”. 1 sc in next 8 sts in “B”. 1 sc in next 15 sts in “A”. Turn your work. (70 sts)
Row 85: Ch1, 1 sc in same st, 1 sc in next 14 sts. 1 sc in next 8 sts in “B”. 1 sc in next 8 sts in “A”. 1 sc in next 3 sts in “C”. 1 sc in next 33 sts in “A”, 1 sc in next st in “B”. 1 sc in next 2 sts in “A”, 1 sc in turning ch. Turn your work. (71 sts)
Row 86: Ch1, 1 sc in same st. 1 sc in next 3 sts in “B”. 1 sc in next 33 sts in “A”. 1 sc in next 3 sts in “C”. 1 sc in next 8 sts in “A”. 1 sc in next 8 sts in “B”. 1 sc in next 15 sts in “A”. Turn your work. (71 sts)
Row 87: Ch1, 1 sc in same st, 1 sc in next 14 sts. 1 sc in next 8 sts in “B”. 1 sc in next 8 sts in “A”. 1 sc in next 3 sts in “C”. 1 sc in next 33 sts in “A”. 1 sc in next 4 sts in “B”. Turn your work. (71 sts)
Row 88: Ch1, 1 sc in same st, 1 sc in next 3 sts. 1 sc in next 33 sts in “A”. 1 sc in next 3 sts in “C”. 1 sc in next 8 sts in “A”. 1 sc in next 8 sts in “B”. 1 sc in next 15 sts in “A”. Turn your work. (71 sts)
Row 89 – 136: Repeat row 87 – 88.
Row 137: Repeat row 87.
Fasten off, and weave in loose ends.
+ BACK OF PONCHO
Ch72 using A yarn and 8mm hook.
Row 1: 1 sc in 2nd ch from hook, 1 sc in next 14 sts. 1 sc in next 8 sts in “B”. 1 sc in next 8 sts in “A”. 1 sc in next 3 sts in “C”. 1 sc in next 33 sts in “A”. 1 sc in next 3 sts in “B”. Turn your work. (70 sts)
Row 2: Ch1, 1 sc in same st, 1 sc in next 2 sts. 1 sc in next 33 sts in “A”. 1 sc in next 3 sts in “C”. 1 sc in next 8 sts in “A”. 1 sc in next 8 sts in “B”. 1 sc in next 15 sts in “A”. Turn your work. (70 sts)
Row 3: Ch1, 1 sc in same st, 1 sc in next 14 sts. 1 sc in next 8 sts in “B”. 1 sc in next 8 sts in “A”. 1 sc in next 3 sts in “C”. 1 sc in next 33 sts in “A”. 1 sc in next 3 sts in “B”. Turn your work. (70 sts)
Row 4 – 51: Repeat row 2 – 3.
Row 52: In “A”, ch1, 1 sc in same st, 1 sc in next 2 sts in “B”. 1 sc in next 33 sts in “A”. 1 sc in next 3 sts in “C”. 1 sc in next 8 sts in “A”. 1 sc in next 8 sts in “B”. 1 sc in next 15 sts in “A”. Turn your work. (70 sts)
Row 53: Ch1, 1 sc in same st, 1 sc in next 14 sts. 1 sc in next 8 sts in “B”. 1 sc in next 8 sts in “A”. 1 sc in next 3 sts in “C”. 1 sc in next 35 sts in “A”, 1 sc2tog (creating neckline). Turn your work. (69 sts)
Row 54: Ch1, 1 sc2tog, in same st, 1 sc in next 33 sts in “A”. 1 sc in next 3 sts in “C”. 1 sc in next 8 sts in “A”. 1 sc in next 8 sts in “B”. 1 sc in next 15 sts in “A”. Turn your work. (68 sts)
Row 55: Ch1, 1 sc in same st, 1 sc in next 14 sts. 1 sc in next 8 sts in “B”. 1 sc in next 8 sts in “A”. 1 sc in next 3 sts in “C”. 1 sc in next 32 sts in “A”, 1 sc2tog. Turn your work. (67 sts)
Row 56: Ch1, 1 sc in same st, 1 sc in next 32 sts in “A”. 1 sc in next 3 sts in “C”. 1 sc in next 8 sts in “A”. 1 sc in next 8 sts in “B”. 1 sc in next 15 sts in “A”. Turn your work. (67 sts)
Row 57: Ch1, 1 sc in same st, 1 sc in next 14 sts. 1 sc in next 8 sts in “B”. 1 sc in next 8 sts in “A”. 1 sc in next 3 sts in “C”. 1 sc in next 33 sts in “A”. Turn your work. (67 sts)
Row 58 – 81: Repeat row 56 – 57.
Row 82: Repeat row 56.
Row 83: Ch1, 1 sc in same st, 1 sc in next 14 sts. 1 sc in next 8 sts in “B”. 1 sc in next 8 sts in “A”. 1 sc in next 3 sts in “C”. 1 sc in next 32 sts in “A”, 1 sc in next st, 1 sc in turning ch. Turn your work. (68 sts)
Row 84: Ch1, 2 sc in same st, 1 sc in next 33 sts in “A”. 1 sc in next 3 sts in “C”. 1 sc in next 8 sts in “A”. 1 sc in next 8 sts in “B”. 1 sc in next 15 sts in “A”. Turn your work. (69 sts)
Row 85: Ch1, 1 sc in same st, 1 sc in next 14 sts. 1 sc in next 8 sts in “B”. 1 sc in next 8 sts in “A”. 1 sc in next 3 sts in “C”. 1 sc in next 34 sts in “A”, 1 sc in next st in “A”, 1 sc in turning ch. Turn your work. (70 sts)
Row 86: Ch1, 1 sc in same st. 1 sc in next 2 sts in “B”. 1 sc in next 33 sts in “A”. 1 sc in next 3 sts in “C”. 1 sc in next 8 sts in “A”. 1 sc in next 8 sts in “B”. 1 sc in next 15 sts in “A”. Turn your work. (70 sts)
Row 87: Ch1, 1 sc in same st, 1 sc in next 14 sts. 1 sc in next 8 sts in “B”. 1 sc in next 8 sts in “A”. 1 sc in next 3 sts in “C”. 1 sc in next 33 sts in “A”. 1 sc in next 3 sts in “B”. Turn your work. (70 sts)
Row 88: Ch1, 1 sc in same st, 1 sc in next 2 sts. 1 sc in next 33 sts in “A”. 1 sc in next 3 sts in “C”. 1 sc in next 8 sts in “A”. 1 sc in next 8 sts in “B”. 1 sc in next 15 sts in “A”. Turn your work. (70 sts)
Row 89 – 136: Repeat row 87 – 88.
Row 137: Repeat row 87.
Fasten off, and weave in loose ends.
+ ASSEMBLY
Follow “Assembly Diagram” below. Block the finished front/back panels of the poncho to correct height/width.
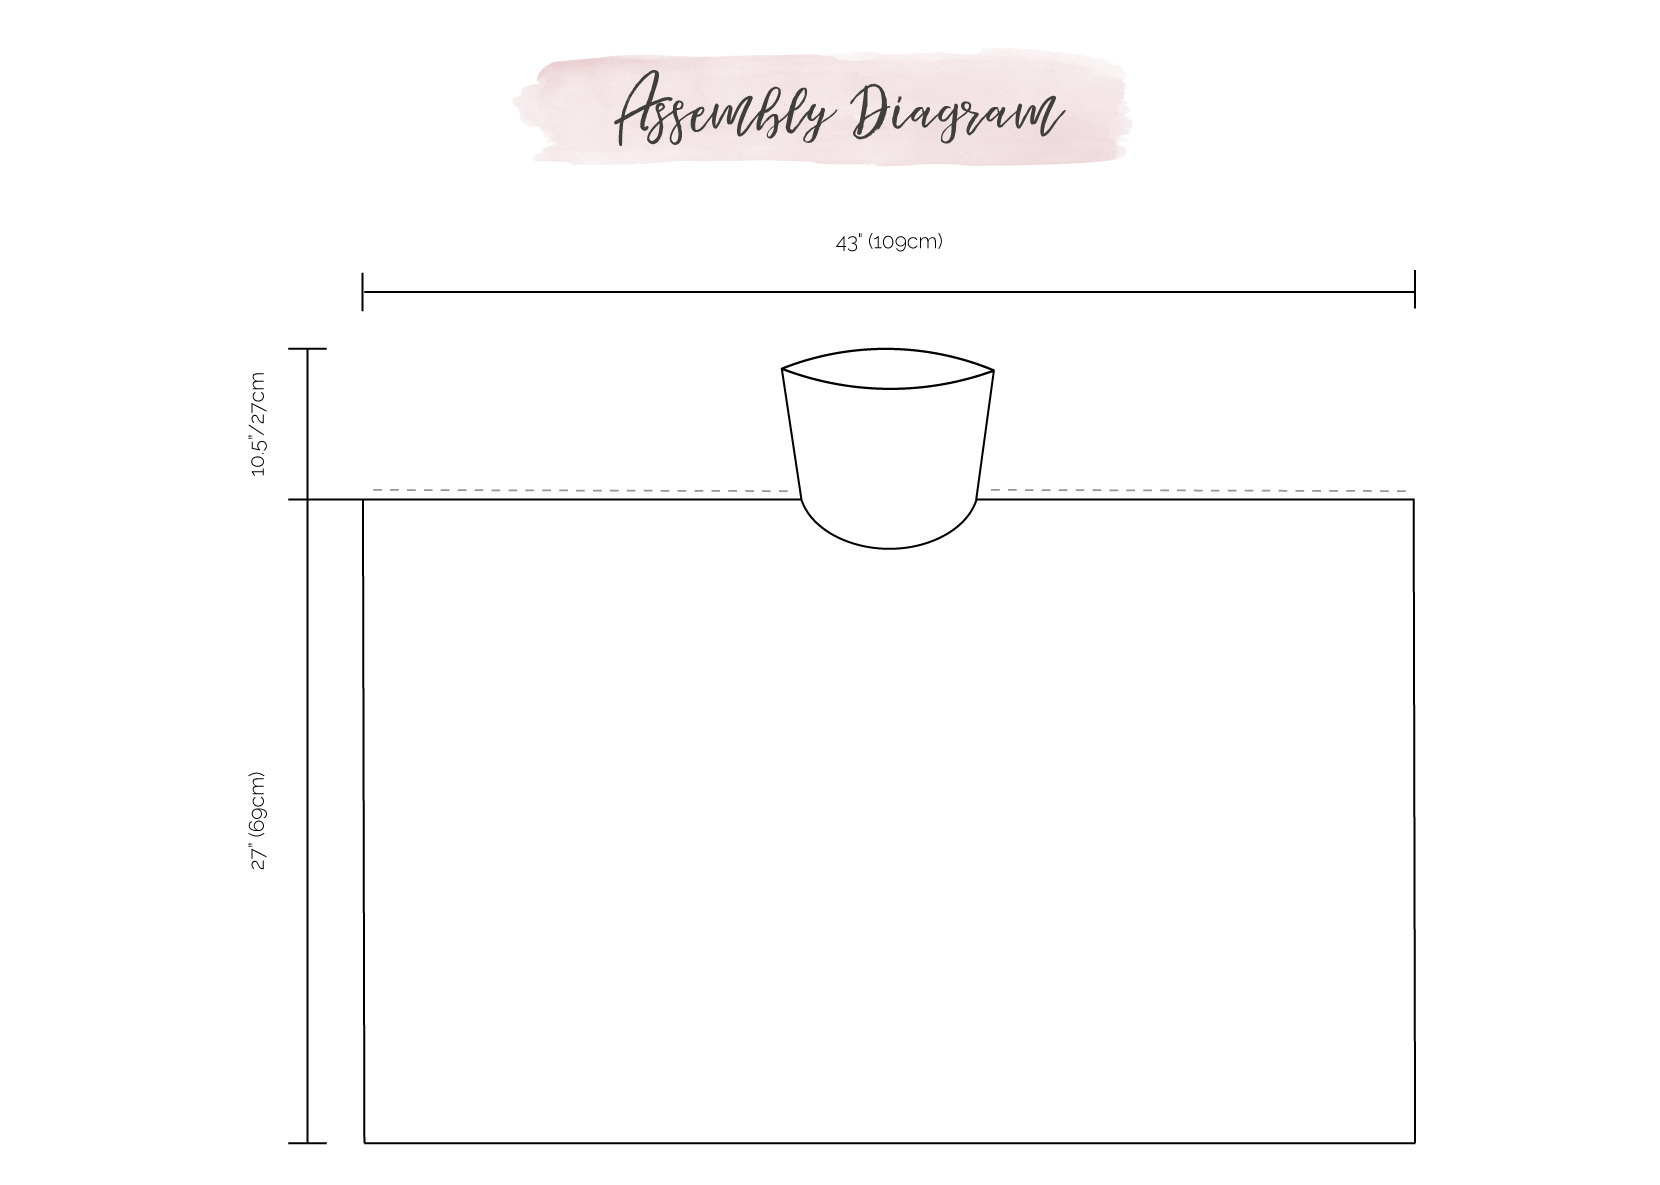
Place the “Front of Poncho” on top of the “Back of Poncho”, flip the layout inside out, and join the two panels together by seaming the shoulders of the two panels – working along the ends of Row 1-52 and then Row 86-137 (the side where the neckline decreases were made). The remaining opening is the neckline.
Fasten off, and weave in loose ends.
+ TARTAN DESIGN
Note: Cut lengths of yarn approx 78”/198cm long, thread 2 strands of yarn onto a tapestry needle, and use the chart below as a design guide. Strands will alternate ‘under’ and ‘over’ sc’s to create woven appearance. When working through rows where panels are seamed at the shoulders, continue the embroidery detailing across both the front/back of the poncho. When working through rows where the opening of the neckline is, continue using the design guide, but working across only one panel at a time.

Row 1: Using “A” yarn, *weave one vertical line over one sc. Weave one vertical line under one sc. Repeat from the * across the entire row, leaving approx 7”/18cm at each end for tassels. Use the weaving chart below as a guide.
Row 2: Using “A” yarn, *weave one vertical line under one sc. Weave one vertical line over one sc. Repeat from the * across the entire row, leaving approx 7”/18cm at each end for tassels. Use the weaving chart below as a guide.
Row 3 – 11: Repeat row 1 – 2.
Row 12 – 19: Using “B” yarn, repeat row 1 – 2.
Row 20 – 27: Using “A” yarn, repeat row 1 – 2.
Row 28 – 30: Using “C” yarn, repeat row 1 – 2.
Row 31 – 64: Using “A” yarn, repeat row 1 – 2.
Row 65 – 73: Using “B” yarn, repeat row 1 – 2.
Row 74 – 107: Using “A” yarn, repeat row 1 – 2.
Row 108 – 110: Using “C” yarn, repeat row 1 – 2.
Row 111 – 118: Using “A” yarn, repeat row 1 – 2.
Row 119 – 126: Using “B” yarn, repeat row 1 – 2.
Row 127 – 137: Using “A” yarn, repeat row 1 – 2.

+ TASSELS
To create tassels, divide the 78”/198cm lengths from the tartan design into groups of 8 strands (except for one group, which will have 10 strands) evenly along the edge of the poncho, and knot to secure. Trim tassels to desired length.
+ ROLL NECK
Note: For the roll neck, you will be working only into the back loops of the sts (and not through both loops) from the previous row, from row 2 and onwards.
Ch36 using A yarn and 6mm hook.
Row 1: 1 sc in 2nd ch from hook. 1 sc in next 34 sts. Turn your work. (35 sts)
Row 2 – 90: Ch1, 1 blsc in same st. 1 blsc in next 34 sts. Turn your work. (35 sts)
Fasten off, and weave in loose ends.
Sl st together the last row and the foundation chain to form a roll neck. Seam to neckline, lining up the seamline of the roll neck to the centre of the back of the neckline.


Hope you all enjoy this pattern for a pullover poncho, perfect for walks through the highlands.
Be sure to use the tag #hopefulhoneyhive on Instagram to show me your version of my design!
Have a lovely day crocheting…


I love this poncho! Another beautiful pattern by Hopefully Honey! Thanks for sharing! Frances
Beautiful! Do you have a child size version?
You have outdone yourself once again, Olivia! GORGEOUS design! Thank you so much!!
Gorgeous design, Olivia!
Wow! Very nice design! Thank you for sharing 🙏🏻
Have a nice day….
Aknita
why am I unable to get your free patterns?
I am having an issue as well. When I click on the pattern, it jumps and then goes right back to the picture. No pattern to see or scroll down and read. I’m not sure what I’m not doing correctly to get it to open. I’m not complaining about whether it free or not. Just new to site and can’t get pattern to open. Would appreciate a few instructions. Thank you
It says “free pattern” and yet there is no way to print it. It is NOT free, your misinformation is very frustrating
If you scroll down the whole pattern is there between the ads for free. If you want the ad free printable version you pay for it.
All you have to do to get it free is read it off the site, or cut and paste the pattern into your notes and voila! Pattern obtained for free☺️
Good explanation of how to get this beautiful pattern that Olivia generously shared with all of us 🙂
Complain! Complain! I am GRATEFUL that I have AN OPTION…FREE with ads! Or BUY without ads! and PRINT YOUR OWN! She has done all the work! Published it! Complete with GORGEOUS PHOTOS! And gave you a CHOICE of how to GAIN ACCESS to HER CREATION! Make a decision that works FOR YOU! Then, Thank her for sharing!
Cut and Past is a very SIMPLE thing to do!! Very few patterns are free these days!…Especially one as beautiful as this.
It doesn’t say “free pdf” it says, “free pattern,” which it is. Online. Did you have to pay to read it? Nope. Therefore it is free and this wonderfully talented person has maintained her integrity.
Additionally, she has given you permission to copy and paste the pattern, which is a Big no no on most others’ sites. Several of them have disabled the ability to select text, in fact. You may not even have to copy and paste, you can select the information you need and print to pdf. Tick the option “print selection” to print only what you’ve selected. Thanks to Adobe, for their (also free) pdf reader.
Turn that frown upside down and give thanks to this gal for her generosity.
Please, re-read the options – Crochet Hugs!
Can this be done with just one color
Yes! Where it says “B” and “C” you would simply continue with your single color instead of switching from color “A” (your one color) to “B” or “C.”
That is beautifully done. I enjoy your website.
Gorgeous! Thank you for sharing this amazing pattern; it will be perfect for long-haul flights and travel in general!
In love with this and have already begun to make this for my little sister that is heading over to Scotland for two years 😀
This poncho is amazingly beautiful!! I definitely want to give it a try. I love all your patterns and find them easy to follow. Thank you for inspiring all of us to try new things!
Can you contact me on facebook. Dana bradley (gray sweatshirt blonge hair)… i am struggling and need some pointers from someone who has done it.
I love this pattern!!!
Do you carry the yarn in back as you crochet?
I would also love to know this. Should the colors be carried? Should I be cutting and weaving in ends. This isn’t clear.
I am using a seperate small ball of yarn for each colour change. I’m using a shoe box with holes punched in the side so they don’t get tangled up. Hope this helps.
Have you ever done a video to go with this? My friend is trying to do this with the kit but really struggling.
I am just beginning this pattern. Thanks to all the questions in the comments, I did not charge right in. I watched a few videos on line about crocheting tartan designs. So far I would agree it is easy, although as i am fairly new at crocheting, I had to learn some new techniques for creating a tartan. I watched a few videos on utube to learn how to manage the yarn changes (bobbins) and how to flip the product and keep the yarn attachments on the back side. So far I am enjoying the process and learning new skills. Thank you for the beautiful pattern. I can’t wait to finish it!
I usually don’t like ponchos but when I saw the name of this pattern I had to check it out. I am a genealogist an my McIntyre ancestors came from Glencoe, Scotland. I might have to make this. Thanks for sharing your talents.
This is absolutely gorgeous. Thank you so much for sharing with others. XOXOs
This is the most awesome poncho I have seen for a long time, I really would love to make it as it just looks stunning and cuddly, thank you so much for sharing this pattern
This has to be the most gorgeous wrap I have seen! I can envision so many possibilities for color combinations! While I am not a fan of “Fringing!” anything once the crochet has done it’s “fun”! This will not be the same without it! I love the neckline! It too makes all the difference in the finished poncho, it would not be the same without it! Finally, I have wanted to do a project that incorporates the weave pattern, that was not the size of an afghan, for a long time! And here it is! The wait was worth it! BRAVO! 👏🏾👏🏾👏🏾 Thank you for sharing this FREE pattern! You just made 2019 for me! I truly needed a new inspiration for this year. Thank you! I will share photos of my finished items as I complete them! Can’t wait! Got to go to the yarn store! Right now!
Thank you for the free pattern
Its lovely
LOVE the design. Got a question on construction… Shouldn’t the back panel be an inch or two longer to account for the shoulder blades, so it doesn’t wear shorter in back?
Yeah. I’m wondering too. The back panel is actually shorter. Front is 71 rows deep, back is only 70. Not much of a difference. But still confusing. ESP as you cast on 72. Hmmmm I’m confused. I think I’m going to add in a few rows.
Are you measuring your row width or the width of the finished garment? The row width should be 70cm bc the pattern is crochet from left to right, not top to bottom. Does that make sense??
Sorry. My second comment was an accidental reply. Xxx
You are so very talented!!! This is so gorgeous. And I love that you smile! Years ago you didn’t. I’ve been meaning to tell you that for a long time.
I want to make it but I cant read and understand written patterns, I crochet bu eatching YouTube videos, how do I do it, can someone help me please
Maritza, if you follow it step-by-step you’ll find it easy to do. Avoid getting overwhelmed by reading only the line you’re working on (I read the entire pattern so I can get an idea of where it’s going, but then I step back to working one row at a time).
I did find a tartan style poncho Mikey did a video on. This one is much nicer as it will take quite a bit more work than Mikey’s, but my thought is you can watch his video and perhaps get an idea of how this one will be done so you can step into reading patterns. It won’t let me post the video url, but if you search for Mikey and tartan poncho you should find it.
Dishcloths or stitch how-tos are a Great way to ease into pattern reading. It’s Really easy if you start small and as you gain familiarity it gets easier. Not all patterns are easy, that’s for sure, but this one is well-written.
Another thing I do with written patterns is to put each step of the row down on its own line. For this one I would copy and paste then arrange it thusly (kind of like dissecting it!):
Row 1:
1 sc in 2nd ch from hook,
1 sc in next 14 sts.
1 sc in next 8 sts in “B”.
1 sc in next 8 sts in “A”.
1 sc in next 3 sts in “C”.
1 sc in next 33 sts in “A”.
1 sc in next 4 sts in “B”.
Turn your work. (71 sts)
Each of those letters represents a yarn color. The (71 sts) at the end is how many stitches you should have at the end of the row.
I hope that helps!
Thank you sooo much
JMFS, could you post the link to the video you mentioned above. Thanks so much.
You are so very talented!!! This is so gorgeous. And I love that you smile! Years ago you didn’t and I’ve been meaning to tell you that for a long time.
Soooooo awesome and beautiful poncho!!! Can’t wait to start this!!! Your site is so helpful. Thank you for your time!!!
My gauge is as the pattern instructs (10 sts, 13 rows with the 8mm hook) yet the width of the front panel is only 28″ (71cm) instead of 43″ (109cm). Where have I gone wrong?
Are you measuring your row width or the width of the finished garment? The row width should be 70cm bc the pattern is crochet from left to right, not top to bottom. Does that make sense??
Mine is way off for dimensions also and I LOVE this pattern and really want to get it made for my daughter. Do you use 2 strands at the same time? Just wondering how mine is so small, please help?
What a beautiful pattern! I love the design! Thank you for sharing!!
hotmail login account
Good morning Olivia , you have made another wonderful creation . BEAUTIFUL ! Have a blessed weekend .
This is gorgeous design, tahnk you for sharing!
This young lady is much more beautiful than princess Kathy.
Is the yarn carried in the back when changing colors?
Great Post and Valuable, I Like This Post… Thanks for Sharing the Post… And if you are in need of any Garden Maintenance service.
Great Post and Valuable, I Like This Post… Thanks for Sharing the Post… And if you are in need of any Garden Maintenance service
Do I cut the yarn to change colors or float it along?
Any chance of doing a you tube video?
Thank you so much for the pattern, looking forward to making this for my sister and sister in law.
This is beautiful, thank you for providing the free pattern! My mom is in a wheel chair after a stroke with limited mobility and is always looking for options that she doesn’t have to struggle with behind her back. I think I’m going to try and make this for her for Christmas! I may end up buying the pattern just so I can get the stitching correct but either way this pattern is a gem!
Can’t wait to start in on it. It is absolutely fabulous!
Are the yarns to be carried behind the work, the only problem with this is when carrying the charcoal behind the natural Heather you can see it
I just started this project…literally two rows in and I’ve been crocheting over the carried strands, but I can see the darker colors thru the Aran color. I REALLY don’t want to have to weave in ends multiple times in each row. Any other suggestions?
Brilliant pattern! I even managed to do single crochet foundation row With changing colour ! And ditched the single colour chain!
change color by doing a Magic Knot instead of cutting and weaving
Yes, this pattern is not clear on how she is starting/stopping colors. A video really needs to be posted so we can see how it’s done.
I am having an issue as well. When I click on the pattern, it jumps and then goes right back to the picture. No pattern to see or scroll down and read. I’m not sure what I’m not doing correctly to get it to open. I’m not complaining about whether it free or not. Just new to site and can’t get pattern to open. Would appreciate a few instructions. Thank you
Hi!! I love this design and can already see my daughter wearing it. I was wondering what size is the model wearing it. My daughter is a woman’s Small and I wondering if I need to make any adjustments so it doesn’t overpower her. Also, what adjustments should I make to this design pattern to make it after for me. I’m a M/L.
Thanks in advance
I am wondering this as well. I hope that different dimensions will be available
I am making this poncho, but when I use the size hook that gives me the right gauge, it seems as though the fabric it creates is terribly loose. I know I will be weaving strands of yarn into the finished product, but before I get too far, I was wondering if someone could provide a close-up picture of the poncho prior to weaving. I want to see how loose your stitches are. Thanks so much!! I’m in love with this poncho and can’t wait to wear the finished product to watch my girls’ spring soccer season.
Hi Sarah, Did you ever manage to resolve this? I’m just making my gauge swatch and even when going two hook sizes up my swatch is a cm too small, and like you, my stitches are now too loose. Wondering how to combat the problem and wondered if you’d managed it!
It’s been years since I was in the highlands, this takes me back!
I look forward to making this poncho. Lovely! I have a question. I am almost 6 ft tall. Do I need to adjust the size on the original chain. Thank you in advance.
Beautiful pattern!
I love the tartan poncho how do I get the pattern
Hello. Please help. I am making this but only using 2 colors. How is this put together? Rectangular or long sides?
OMG I love this..
Hi there I have made the poncho and it turned out beautiful just about to do the tartan design, is there a video anywhere by you or someone on YouTube on how to do that?
Hello. Are both sides to be stitched? It does not show that in picture graph.
Fabulous! Exactly what I’m looking for.
Loved it. Thank you for the great pattern 🙂❤️
I absolutely love this design! I have a question though, in the direction for Back of Poncho, the numbers seem off by one ( from the Front of Poncho). Is this correct? Or am I reading something wrong? Thanks!
hello was wondering this tartan poncho the width is 72 ch or more
Awesome. TY. PS, your model looks a bit like Princess Katherine of England. 😀
This is a wonderful work of art on your part. It is sooooo beautiful and I took inspiration from your design to work on one of my own. You showed me what was possible and now I am trying to make what I see in my head a reality. Thank you so very much for what you do and for sharing your work.
It is so beautiful and personality! I want to buy it
Hi there, just wondering if anyone has ever made this? I purchased the yarn and the ad free pattern but find it very confusing and she doesn’t answer my question about the yarns . Do we carry the colors or what and looking at the pattern I don’t think it will work out quite like the photos. I also wonder if she has testers fir her patterns. Sorry I spent the money.
Hi. Unfortunately we are all in the same boat. I don’t believe she had answered anyone’s questions. I found a cheater version (tutorial/YouTube)from a woman in Spain. I used the subtitles and made a version for my daughter. Have to redo it though (daughter lives in one country and me in another)because it was too short for her.; couldn’t test it out on the model as I went along. The finish product is still nice in the end.
Hi Christine, I haven’t been able to finish mine but have one part-made. I decided to carry the colours but you have to line up your yarns in a row then flip the whole row over each time, otherwise they get incredibly tangled. When I go back to it I’ll most likely use 8 little baskets and thread each yarn through a hole in each to make the rotating easier. Other than that mine is looking good tension-wise so far. I agree, not receiving any answers has put me off because it’s a lot of work to not know if you’re doing it right! Hope that helps a little, anyway.
Yeah, she doesn’t respond to anyone who has questions about her patterns. I wound up giving it a 1-star review on Ravelry.
You don’t carry yarn. I am working on it right now.
Would you have a video follow along for this poncho? That would be amazing!!! Beautiful!
What a gloriously simple but beautiful pattern! With my Scottish roots showing, I plan to make one of these for my trip to Scotland next year – in my family’s tartan colors! Thank you for your beautiful skill and sharing!
It’s beautiful and so modern, i really want to do it !
I’m confused…. The pattern says to use 2625 yards of Aran (10 ply) yarn & yet the Lion Brand Wool Ease is only 4 ply Double Knit/Worsted weight. Could anyone shed light on this plz?
The best I could find is this, “Worsted weight yarn is a medium weight yarn. It is also referred to as Aran, 10 ply, or category 4” and “Worsted weight yarn is the American term for yarn that you might spy in Australia or the UK as ’10 ply’ yarn.” I couldn’t find any actual 10-plied yarns. I get many results that say worsted is 10-ply, but most of what I’m finding is 3 and 4 ply. Given that the yarn listed was used for the poncho you’ll be safe ignoring the 10-ply portion of it. If you intend to use a different yarn, there is a yarn substitute site that compares yarns by their label information so you can get a better idea of what is needed. Sorry I couldn’t 100% demystify the quandary, and I hope my bit of research helped despite that.
Hi Olivia thank you for sharing such beautiful patterns I most definitely will be trying the poncho I may make it without the roll collar as it doesn’t get all that cold in Perth Western Australia cheers
well managed post
This poncho looks lovely, and warm!!! Great for cool evenings!!
Great information
Hello. New to crochet. I absolutely love this pattern. Is there any way you could upload a step by step tutorial/video. I’m a self taught knitter thanks to YouTube. But when it comes crochet, I’m more of a hands on/visual learner.
I love how your site covers a wide range of topics—there’s something for everyone! visit my site
You have such a unique voice and perspective on these topics. Please continue sharing your thoughts with the world—they’re greatly needed. click this
If you want a first-rate, expert service that honors your comfort and preferences, go no further. Obviously, their main objective is to satisfy customers.
This post felt like it was written just for me – thank you! http://www.centralalbertaexcavating.com
Sorry can’t find the pattern.