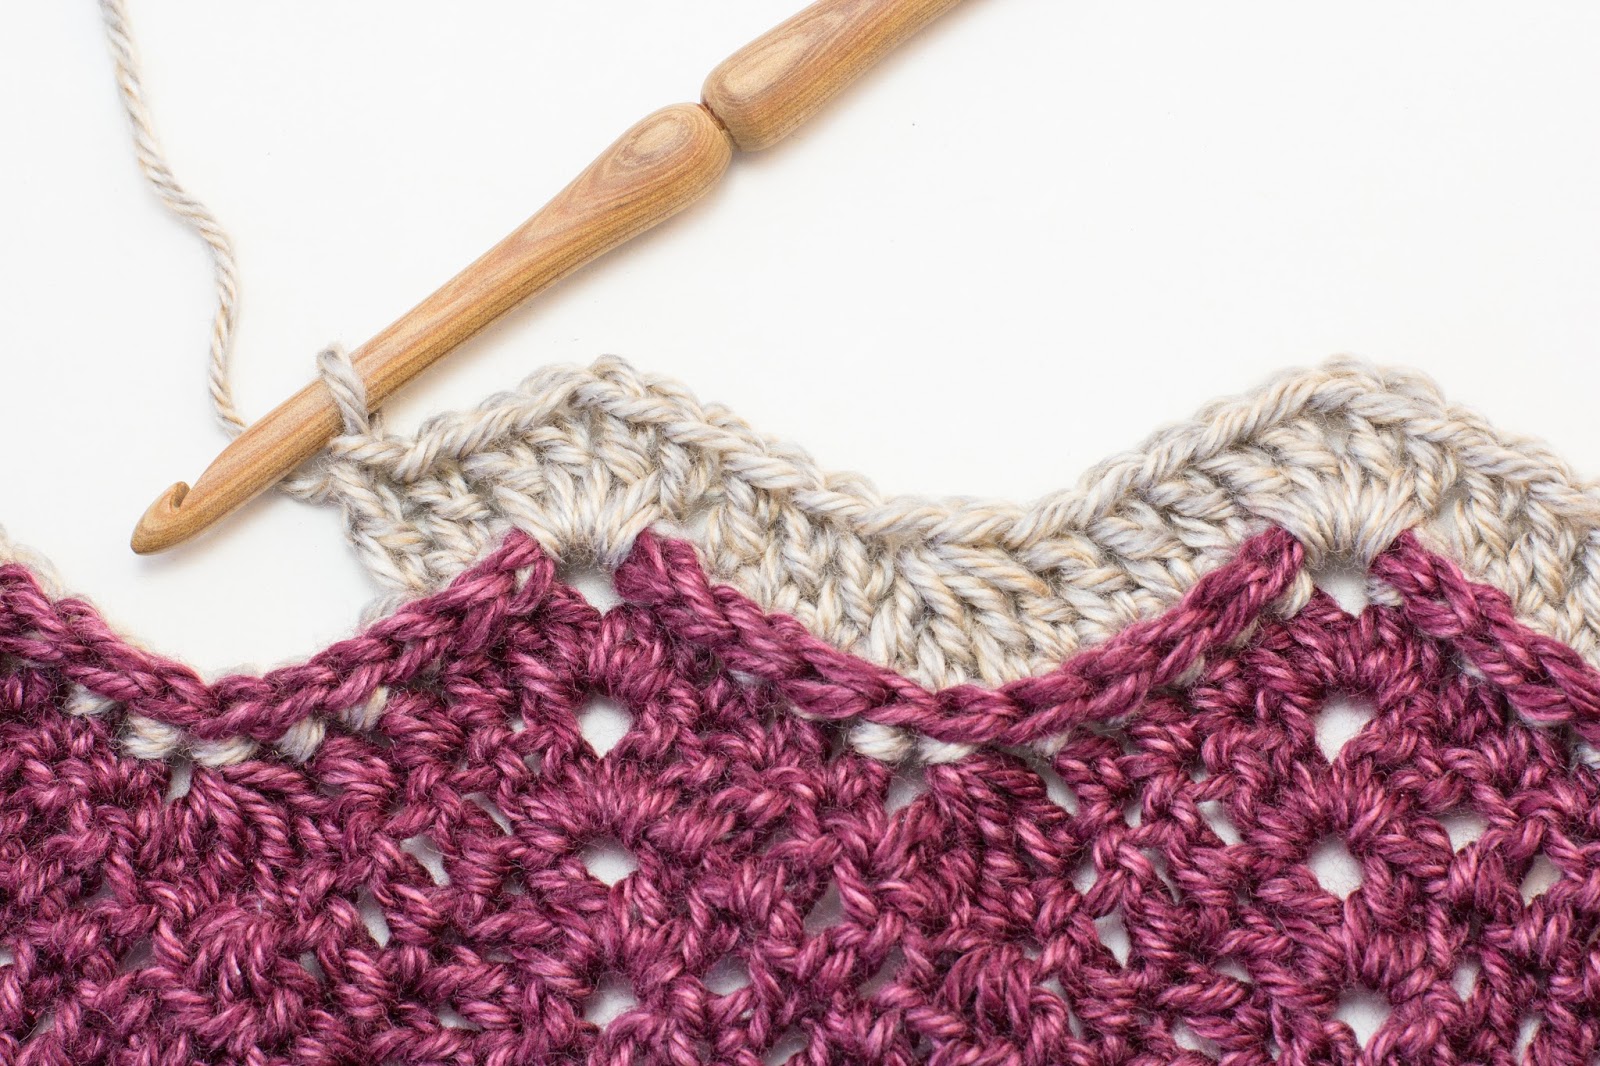
Frosted Berry Chevron Scarf – Crochet Pattern
Winter blows a frosty coat that blankets the world in a crisp, magical scene. A toasty mug in hand and delicate snowflakes caught in your hair take you down a sentimental journey as the air turns cool and brisk.
As you leave the warmth of the fireplace, envelope yourself in the Frosted Berry Chevron Scarf, an excellent layering piece for wandering through your favourite festive markets this season.
With a variety of textures on display, there’s no doubt that this effortlessly chic scarf makes the ideal accessory, whether loosely draped over your cool shoulders or wrapped at the neck for a versatile look. From the fluffy cosiness of the pom-poms to the unique chevron design, what better way to stay warm this winter as you enjoy a quiet afternoon stroll through a snow capped forest…
Soft, squishy and bouncy, this flowy scarf is made with Lion Brand Heartland, quickly working up into the ideal accessory to snuggle in on a crisp morning as you hurry off to work.
Because of the intricate ripple design I’d consider this an intermediate pattern, but an ambitious beginner may be able to tackle this one as I’ve also included a ton of how-to photos to help make the learning process all the more enjoyable. Hooks in hand, ready to embark on this crochet pattern? You can find the free pattern below, and as always you can purchase an ad-free, printable PDF version here,or grab the yarn kit from Lion Brand here.
Add To Cart
Materials
7.00mm (2) Crochet Hook
950 [1080yds] Worsted Yarn (10ply)
– Lion Brand Heartland “Badlands” (3 [3] skeins); Color A
– Lion Brand Heartland “Grand Canyon” (2 [2] skeins); Color B
Pom-pom Maker
Tapestry Needle
Size
Width: 10″ (25cm)
Length: 62” (157cm)Teen/Adult
Width: 10″ (25cm)
Length: 78” (198cm)
Gauge
11 stitches + 7 rows = 4″/10cm in double crochet
Stitches & Abbreviations
ch – chain stitch
sc – single crochet
dc – double crochet
dc2tog – double crochet 2 together
dc4tog – double crochet 4 together
fpsc – front post single crochet
*Yarn over, insert hook into the next stitch. Yarn over, draw up a loop. Yarn over, pull through 2 loops. Repeat from the * once more (3 loops on hook). Yarn over, pull through all 3 loops on hook.
*Yarn over, insert hook into the next stitch. Yarn over, draw up a loop. Yarn over, pull through 2 loops. Repeat from the * 3 more times (5 loops on hook). Yarn over, pull through all 5 loops on hook.
Insert hook under the post of the next stitch. Yarn over, draw up a loop (2 loops on hook). Yarn over, draw through all 2 loops on hook.
+ PATTERN
Note: This pattern is worked in the row, from side to side. The pompoms are attached to the points on either end of the scarf. It is imperative to check gauge and maintain an even tension throughout.
SCARF:
Ch35 [35] using color A and 7.0mm hook.
Row 1: Ch2 (counts as 1st dc), 1 dc2tog, * 1 dc in next 3 sts, (2 dc, ch1, 2 dc) in next st, 1 dc in next 3 sts, 1 dc4tog. Repeat from the * 1 [1] more time. 1 dc in next 3 sts, (2 dc, ch1, 2 dc) in next st, 1 dc in next 3 sts, 1 dc2tog, 1 dc in next st. Turn your work. (36 [36] sts)
Row 2: Ch2 (counts as 1st dc), 1 dc2tog, * 1 dc in next 3 sts, (2 dc, ch1, 2 dc) in next ‘ch1’ space, 1 dc in next 3 sts, 1 dc4tog. Repeat from the * 1 [1] more time. 1 dc in next 3 sts, (2 dc, ch1, 2 dc) in next ‘ch1’ space, 1 dc in next 3 sts, 1 dc2tog, 1 dc in next st. Turn your work. (36 [36] sts)
Row 3 – 7: Repeat row 2.
Row 8: Change to color B. Ch1, 1 sc in same st, 1 fpsc in next 6 sts, ch2, * 1 fpsc in next 11 sts, ch2. Repeat from the * 1 [1] more time. 1 fpsc in next 6 sts, 1 sc in next st. Turn your work. (36 [36] sts)
Row 9: Ch2 (counts as 1st dc), 1 dc2tog, * 1 dc in next 3 sts, (2 dc, ch1, 2 dc) in next ‘ch1’ space from 2 rows below – simultaneously working around the ‘ch2’ from the previous row. 1 dc in next 3 sts, 1 dc4tog. Repeat from the * 1 [1] more time. 1 dc in next 3 sts, (2 dc, ch1, 2 dc) in next ‘ch1’ space from 2 rows below – simultaneously working around the ‘ch2’ from the previous row. 1 dc in next 3 sts, 1 dc2tog, 1 dc in next st. Turn your work. (36 [36] sts)
Row 10: Change to color A. Repeat row 8.
Row 11: Repeat row 9.
Row 12 – 15: Repeat row 2.
Row 16: Change to color B. Repeat row 8.
Row 17: Repeat row 9.
Row 18 – 19: Repeat row 2.
Row 20: Change to color A. Repeat row 8.
Row 21: Repeat row 9.
Row 22 – 31: Repeat row 2.
Row 32: Change to color B. Repeat row 8.
Row 33: Repeat row 9.
Row 34 – 37: Repeat row 2.
Row 38: Change to color A. Repeat row 8.
Row 39: Repeat row 9.
Row 40 – 45: Repeat row 2.
Row 46: Change to color B. Repeat row 8.
Row 47: Repeat row 9.
Row 48: Change to color A. Repeat row 8.
Row 49: Repeat row 9.
Row 50 – 53: Repeat row 2.
[Row 54]: Change to color B. Repeat row 8.
[Row 55]: Repeat row 9.
[Row 56 – 57]: Repeat row 2.
[Row 58]: Change to color A. Repeat row 8.
[Row 59]: Repeat row 9.
[Row 60 – 69]: Repeat row 2.
[Row 70]: Change to color B. Repeat row 8.
[Row 71]: Repeat row 9.
[Row 72 – 73]: Repeat row 2.
[Row 74]: Change to color A. Repeat row 8.
[Row 75]: Repeat row 9.
[Row 76 – 79]: Repeat row 2.
Row 54 [80]: Change to color B. Repeat row 8.
Row 55 [81]: Repeat row 9.
Row 56 [82]: Change to color A. Repeat row 8.
Row 57 [83]: Repeat row 9.
Row 58 [84] – 63 [89]: Repeat row 2.
Row 64 [90]: Change to color B. Repeat row 8.
Row 65 [91]: Repeat row 9.
Row 66 [92] – 69 [95]: Repeat row 2.
Row 70 [96]: Change to color A. Repeat row 8.
Row 71 [97]: Repeat row 9.
Row 72 [98] – 81 [107]: Repeat row 2.
Row 82 [108]: Change to color B. Repeat row 8.
Row 83 [109]: Repeat row 9.
Row 84 [110] – 85 [111]: Repeat row 2.
Row 86 [112]: Change to color A. Repeat row 8.
Row 87 [113]: Repeat row 9.
Row 88 [114] – 91 [117]: Repeat row 2.
Row 92 [118]: Change to color B. Repeat row 8.
Row 93 [119]: Repeat row 9.
Row 94 [120]: Change to color A. Repeat row 8.
Row 95 [121]: Repeat row 9.
Row 96 [122] – 101 [127]: Repeat row 2.
Fasten off, and weave in loose ends.
POM-POMS:
Make a pom-pom using yarn in B and pom-pom maker (Make sure the pom-pom measures 2.25”/6cm in size). Trim and shape the pompom until it is fluffy and rounded. Make 7 pom-poms, then tie the pom-poms onto the 7 points of the scarf. Secure and weave in all ends.
Hope you all enjoyed the pattern for this cosy chevron scarf.
Be sure to use the tag #hopefulhoneyhive on Instagram to show me your version of my design!
Have a lovely day crocheting…


I love this pattern! You are so talented! Thanks
This is beautiful! And you look like Cara Delevingne. 🙂
Absolutely gorgeous!!
Thank you for a great explanation. I was looking online for a similar idea and really appreciate it
This scarf is so beautiful. I like it so much. Thanks for sharing the pattern with us. Kindest regards Undine
Just saw this on ravelry and am in LOVE!! Crap!! Now I'm gonna have to move this to the top of my WIP list!! (and the list is SOOO long, lol)
looks so lovely.. it's on my list now! 🙂
I am having so much trouble getting this pattern going. I am right on until Row 2…lol…nothing is lining up right…it seems the ch 2 messes up the stitch count and there is nothing to crochet into at the end of the row…ch 2 is too flimsy to stitch into for a row ending. I even bought the 7 mm hook and the gorgeous Heartland yarn, which I love anyway, to do this pattern. The scarf is beautiful, hoping for some help.
Hello Connie, sorry to hear you're having some difficulty! Have you ever crocheted ripples/chevron designs before? If not, I'd recommend looking over a tutorial like this one (to give you a better understand); https://www.youtube.com/watch?v=Fh34IApTb84
If you find crocheting into the 'ch2' too flimsy, maybe try either crocheting the 'ch2' a bit tighter, OR, crochet 1 dc in the same st as the 'ch2', and just make sure then to work only into the dc and not the 'ch2' when you reach the end of the rows.
Hope this helps,
Olivia
Olivia, I came back to it this morning and have it figured out. I had done chevron designs in the past, but I think the problem is with doing the dc2 ch2 dc2 in same space. On the uphill it seems that a stitch is skipped and on the downhill a stitch isn’t skipped. Haven’t figured that out, but it looks lined up and the ch2 at beginning of rows done as a standing dc is working better for me. Thanks for responding…I’m so glad I came back to figure it out…beautiful pattern, as always!
hi. i buy this beautiful pattern, but i dont now what im doing wrong because i count 38 stitches in the first row.
where is the pattern?!
i need toiutorial vidio for this ….cause i want to make it …you are really so talented
Hi Olivia!
I just found this pattern and would love to make this beautiful scarf. I am not good at reading the patterns I wish you could do a video tutorial for this gorgeous pattern !
Why is there never a print button?
New to your site and would like to download the patterns. When I click on Glencoe Tartan Poncho pattern, it doesn’t open for a download. What am I missing?